How to Make Electronic Projector at Home: A Complete Guide
Have you ever wanted to create your own electronic projector at home but didn’t know where to start? With the right materials and a bit of creativity, making a homemade projector is not only possible but also a rewarding project. In this guide, you will learn how to make electronic projector at home using common household items and straightforward techniques. Whether you aim to project movies for a cozy night in or showcase presentations for work, this article will walk you through each step of the process. You’ll discover essential components, assembly methods, and tips for optimizing your projector’s performance, ensuring you achieve impressive results. Let’s get started on this exciting DIY journey!
Understanding the Basics of Projectors
Before diving into making your own electronic projector, it’s crucial to understand how projectors work. Projectors take images from a source, like a computer or smartphone, and project them onto a larger surface. They typically utilize a lens and a light source to magnify and display the image. Knowing these fundamentals will help you identify the components you need for your DIY project and how to assemble them effectively.
Components of a Projector
A basic projector consists of a light source, a lens, and a projection surface. The light source illuminates the image, while the lens focuses and magnifies it for projection. Understanding each component’s role allows you to select suitable alternatives when building your projector at home.
Types of Projectors
There are various types of projectors, including LCD, DLP, and LED. Each type uses different technology to project images. For instance, LCD projectors use liquid crystal displays, while DLP projectors use micro-mirrors. Familiarizing yourself with these types will guide your design choices.
Key Points:
- Projectors magnify images from a source and project them onto a surface.
- Understanding the components helps in selecting alternatives for your DIY projector.
Materials and Tools Needed for DIY Projector
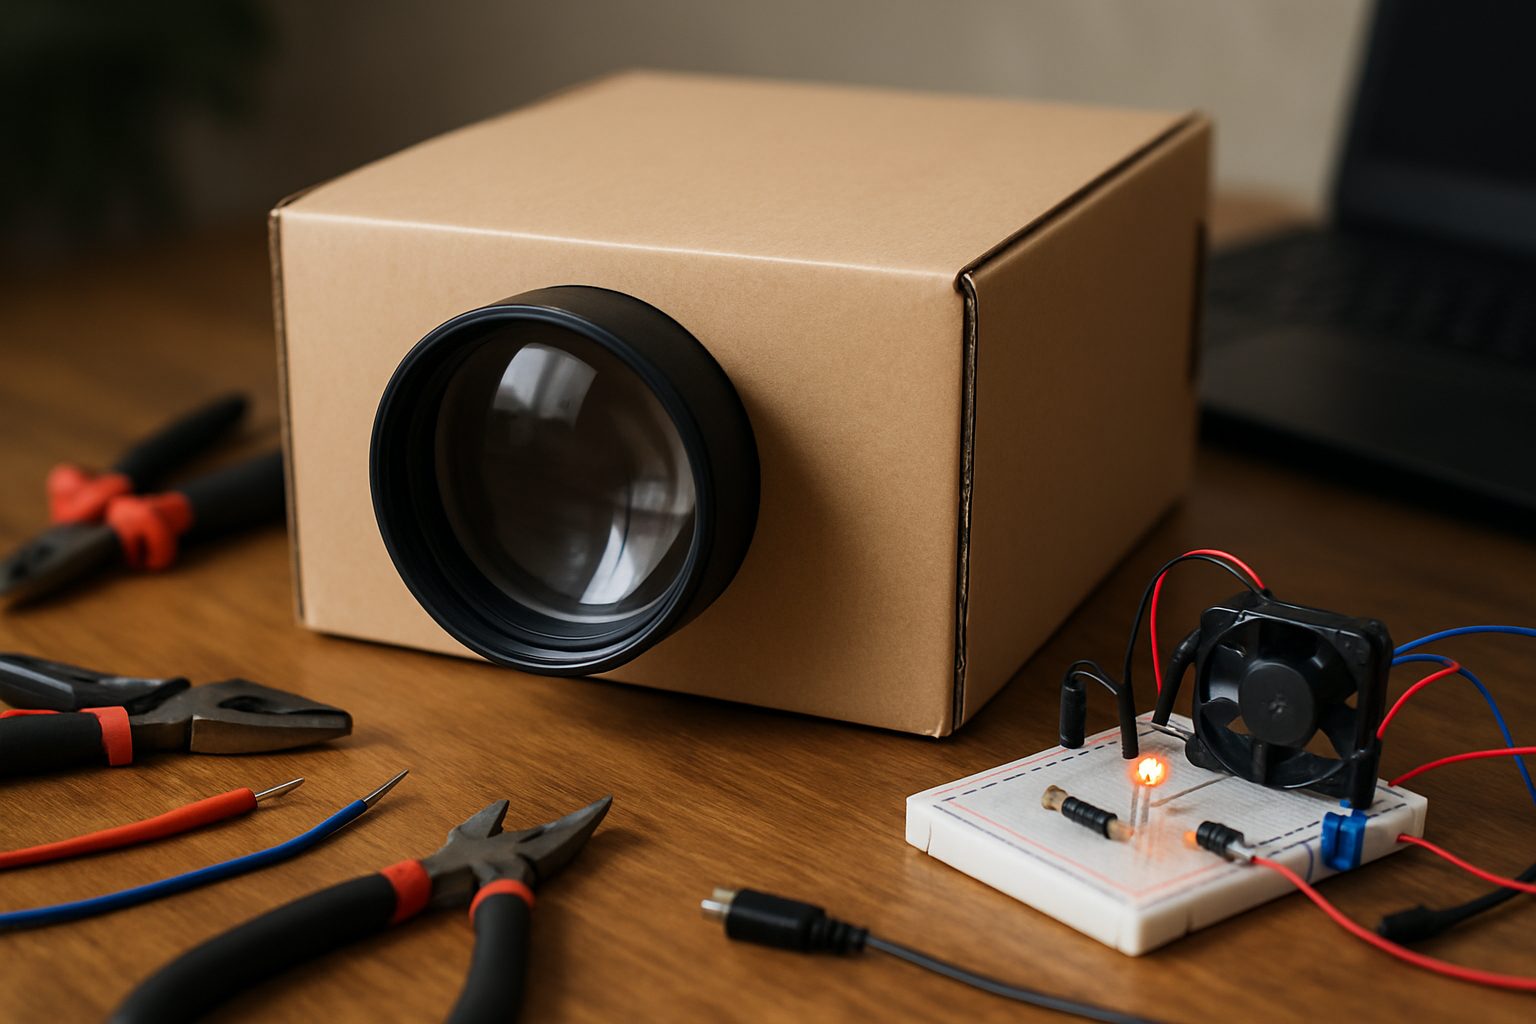
Creating your electronic projector requires specific materials and tools. Commonly used items include a cardboard box, a lens, a light source (like an LED bulb), and a reflective surface. Knowing what you need ahead of time can streamline the building process and enhance the quality of your final product.
Essential Materials
For your DIY projector, you will need a cardboard box (to house the components), a magnifying glass (as the lens), and a light source (like a flashlight or LED). These materials will form the core structure of your projector, so ensure they are sturdy and in good condition.
Tools for Assembly
Basic tools such as scissors, a ruler, and tape or glue will be necessary for assembling your projector. If you have access to a drill, it can be helpful for creating holes for the light source and lens. Having the right tools will enable a smoother assembly process.
Key Points:
- Gathering the right materials is essential for building a functional projector.
- Basic tools will aid in the assembly and ensure a better final product.
Understanding the Basics of DIY Projectors
Before embarking on making an electronic projector at home, it’s essential to grasp the fundamental principles behind how projectors work. A projector takes light from a source, typically a bulb or LED, and passes it through a lens to enlarge an image onto a screen. This understanding helps you choose the right materials and configurations for your projector. The most common DIY projectors use a simple setup involving a magnifying lens, light source, and a projection surface. Knowing how light interacts with lenses will help you create a clearer image and ensure the best viewing experience.
Components Needed
To create a basic electronic projector, gather essential components like a magnifying lens, light source (such as an LED), and a projection surface (like a white wall or screen). A cardboard box can serve as the housing for your projector, allowing you to control light leakage. Additionally, you’ll need a smartphone or tablet to display images or videos, as this will serve as your media source.
Setting Up Your Projector
Begin by cutting a hole in the cardboard box to fit the magnifying lens securely. Position the light source at the back of the box, ensuring it is aimed directly at the lens. Place your smartphone or tablet at the opposite end, adjusting its distance from the lens to achieve a clear image. Finally, ensure that the box is sealed to prevent any light from escaping, which can distort the projection quality.
Key Points:
- Understanding the projector’s basic mechanics is crucial.
- Choosing the right materials directly impacts image quality.
💡 Use a lens with a larger diameter for better image quality.
💡 Experiment with different distances between the lens and the light source to find the optimal setup.
Advanced Techniques for Optimal Projection
Once you’ve mastered the basics, consider implementing advanced techniques to enhance your DIY projector’s performance. This may involve optimizing the light source, improving the lens setup, or even adding features like adjustable focus. These enhancements can significantly elevate the clarity and brightness of the projected image, giving you a more professional-looking result. Additionally, exploring different projection surfaces can also affect the final output, so experimentation is key.
Improving Light Source Efficiency
The brightness of your projector largely depends on the efficiency of your light source. If you’re using an LED, consider using a reflector behind it to direct more light towards the lens. Alternatively, using a more powerful light source (while ensuring it doesn’t overheat) can enhance visibility, especially in well-lit environments. Adjusting the angle of your light source can also help achieve better illumination.
Enhancing Image Quality with Lenses
Using multiple lenses can improve focus and reduce distortion. Experiment with different lens combinations, such as a convex lens paired with a concave lens, to refine the image quality. Additionally, ensuring that the lenses are clean and free of smudges will prevent any unwanted blurriness in your projection. Regularly adjusting the lens position while projecting can also help find the best focus.
Key Points:
- Advanced techniques can greatly improve projection quality.
- Experimentation is key to finding the best setup for your projector.
💡 Always test your projector in a dark room to assess performance.
💡 Adjust the height of your projector for optimal image size on the screen.
EXPERT TIPS Pro Advice
Calibrate your focus frequently.
Regularly adjusting your focus ensures that you maintain the sharpness of the image, especially if you change the distance between the projector and the screen.
Choose a matte surface for projection.
A matte surface diffuses light evenly, reducing glare and improving the overall quality of the image projected.
Create a dark environment.
Minimizing ambient light enhances the visibility of the projected image, making it easier to see details and colors accurately.
Consider sound setup.
Enhancing audio output with external speakers can significantly improve the viewing experience, as visuals often accompany sound in media.
Document your process.
Keeping notes of your materials and configurations can help you replicate successful projects or troubleshoot issues more efficiently in the future.
Frequently Asked Questions
Conclusion
Creating an electronic projector at home can be a fun and educational project. By using simple materials like a magnifying glass and a cardboard box, you can craft a device for projecting images or videos. Remember to optimize the setup for the best viewing experience.
🎯 Key Takeaways:
- Use a magnifying glass for image projection.
- Ensure a dark environment for better visibility.
- Adjust focus for clarity and brightness.
- Stability of the setup is essential for a clear image.
- Experiment with distance to alter image size.
Expert Advice: Embrace the DIY spirit and experiment with different configurations. The more you tweak your setup, the better your results will be. Keep learning and refining your technique for an enjoyable home cinema experience.
Start your projector project today and discover the joy of DIY technology!
Leave a Reply